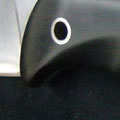
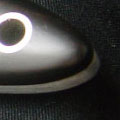
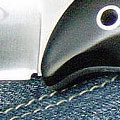
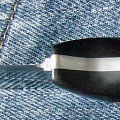
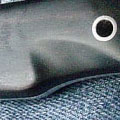
With the fire starting qualities my knife had to have in mind I ground a small, almost halve circle just before the place I wanted my scales to start (about 8-10mm wide the size of my fire steel). This would act as a thumb rest while making a 'carving cut', but more important, would keep the fire steel firm in place (not ruining the rest of the knife finish or scales), when striking the steel. I did not know if this would work, but the gamble paid off, the little dent makes sure you have the blade well in control and directs the ray of sparks in the process.
I relieved the sharp 90 degree angles on the top of the blade just a little (not the ones of the fire steel 'dent' because for a fire steel to work you need a sharp/straight edge!), just because i hate it when you make a small hole in a piece of e.g. wood the top of the blade digs in. When relieving the edges a bit you cab turn it freely.
After that I came to discover that the tubing I got from www.nordellknives.com was oversized. The holes predrilled were 5,5mm and the tubing I got was 1/4" or 6,35mm (probably for standard corby rivets). At www.gatherwood.nl (a dutch knife maker) it was suggested to try and make the tubing a bit smaller in diameter by putting a small piece in a drill press and filing or sanding it smaller. I tried that but there remained not enough metal to use as tubing. After that I tried the method used at www.nothcoastknives.com (a great place for materials and blades for the not yet professional, mostly hand tool using starting knife maker like myself. But more importantly it has some great detailed hands-on tutorials for a variety of knives.) There the author used a carbide grind bit in a dremel kind of tool to enlarge the holes in a heat treated blade. I had some of those grinding bits lying around and with a slow circular clockwise motion I ever so slowly enlarged the holes. (the blades by fallknives are fully hardened to 61 rockwell so drilling is for a not professional is near to impossible) After a 45 min period of grinding and test fitting the tube and trying not to overheat the blade too much I had a blade with 3 6,2/6,3 mm holes. After that I secured the blade and on low speed I drilled those holes with a 6,3 cobalt drill (and a drop of oil or two) just to make sure the holes were round, true size and straight!
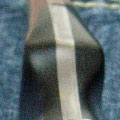
Time to make the scales! I designed the scales with a big backward sweep, mostly because I wanted them to start at the finger guard but wanted it to end well after the firesteel'dent'. The knife has a big handle for its length and I like it better when the handle and blade size are more or less the same, it just looks better. So I decided to start the scales in the exact middle of the knife (8,25 mm from either end and behind the firesteel'dent') and with a fluid motion it had to end at the beginning of the finger guard.
I had a block (40x40x300mm) of ebony and used a ryoba (a japanese pull saw with a crosscut teeth pattern on one side and an ripcut pattern on the other) to cut a piece of 8-9mm. The piece of ebony was then sanded on a 8mm piece of glass with sandpaper sprayglued on top to make sure it would end up perfectly flat. Then I made 2 oversized scales out of the piece and taped the two pieces together, flattened surfaces against each other. I drew the curve I made for the bolster side on one of them with a white pencil. With files and sand drum I sanded until I had a fluid curve.
After taking the tape off I aligned the blade on one of the scales with the flattened side of the scale against the blade. I used a pair of C-clamps to firmly hold it all together and drilled the 3 holes using the blade for direction and repeated the process with the other scale.
more will follow shortly! |