|
| |
|
 |
|
 |
|
|
PROJECT
III
WOLVEN GRAVE GUARD
by Confrontation (Rackham)
Conversion Report Part 3-3
Painting Report Part ?-? >>
ADDING LITTLE BITS & PIECES
|
|
|
|
 |
|
 |
|
|
|
|
|
The
different parts were ready, the base
was finished, time to assemble! This
is why the pinning was done (see
pic 08). I scewed the the leg part
on the base and made sure it was
in the position I wanted the finished
mini to be. Then I took the torso
and looked how it should go, and
glued the parts together using 2
part epoxy glue (the advantage of
this over superglue is that it also
fills gaps (superglue needs a perfect
fit to work best))
click the thumbs once
for a full view!!
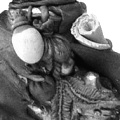
When
I started I thought up this image
of what the mini should look like.
It should be a shaman, so I wanted
extra pouches, bags, feathers etc
(and the trophy head on his left
side had to go!). This was the time
to sculpt those. To cover the place
the head once was I first added an
extra 'skirt' part, then the pouches,
the feathers, and last the flask.
Few basic tips
here:
1. greenstuff mixed with miliput
(the white (fine) variant) gives
you the stuff that I made the lower
part of the flask with. It can be
polished with water or Vaseline (the
top coat of the stuff almost dissolves
in water!) much better than pure
greenstuff, and it can be sanded
much better when dry. Normally I
only make weapons with it because
of those qualities, but here it seemed
logical to use too.
2. When the lower part was finished
and I made the top part (without
the cork) the hole thing was covered
in Vaseline. You would want to use
this (not the stuff you use for......
ahum ("a dirty mind is a joy forever" :)
), but the stuff you can buy at your
local DIY shop to preserve your tools
with!!) because you get this clean
smooth effect when you use Vaseline
on you tools (I use it also on a
little brush after the greenstuff
dried for like 30 minutes to really
polish the surface of eg. muscles,
robes etc.) But try putting a tiny
piece of greenstuff onto that flask
(too resemble the cork) when covered
in Vaseline, impossible! So the tip
here, when working with Vaseline
(try it if you haven't!!) and you
are adding bits of greenstuff, use
a tiny drop of superglue! Glue the
still SOFT greenstuff onto the still
greasy, in my case, flask, it won't
firmly glue it to each other, but
it will hold when you do your sculpting!
Be careful though, don't use too
much glue, and be careful where
you use the glue, the still soft
greenstuff will go rock hard in a
matter of seconds, and can't be sculpted
again!
After the stuff on his hip I added
a rope around his waist, not that
I wanted to, but the torso didn't
fit that good into the leg part,
leaving quite a large gap unfilled.
|
|
|
|
|
|
|
|
|
|
|
|
|
H
e a d - Time to add the
head (if I had to do it again I
would probably do the left arm
first, but anyway...) I glued the
head on, again using 2 part epoxy
glue, and started adding hair to
cover the little gap between head
and torso. Also here it's good
to use Vaseline, it smoothens the
small lines you make, making it
look more real!
L e f t A r
m - Going to his left arm,
bit tricky, this is where I discovered
that I probably should've done
the left arm before the head. I
glued the left arm on, supporting
it with tape, to hold it into position,
and let it dry. After that I sculpted
the rest of his upper arm, simply
by connecting the lines on his
lower arm with the ones on his
shoulder. The arm in place it was
time to re sculpt his goatee.
I had previously clipped his old
one, drilled a hole and glued a
piece of wire into that. Then I
took a bit of green stuff and kneaded
it roughly into shape, put it in
place and cut it with my hobby
knife & home made dental tools,
leaving small cutting marks (representing
hair!) in the greenstuff. When
I was satisfied with the look and
the cutting marks were all around,
leaving no flat areas anymore,
I just pulled most off the green
stuff off again..WHAT you say,
let me explain: Because you made
sure the green stuff was solidly
connected with his chin and made
those cutting marks, you will not
pull everything clean of. Using
a pair of tweezers I gently pulled
of small strands of green stuff
leaving very thin and very lifelike
hair! After that it's best (most
of the time this is a good thing
to do, when you're satisfied with
a certain sculpted detail!) to
make the hair wet with a old brush
and water or use Vaseline instead
(this works even better!!). This
makes the 'skin' of the greenstuff
more even/smooth, when you pull
the greenstuff away you rip all
those fibres apart and in that
state the greenstuff isn't that
strong and will look crapy when
painted, now you polish/restore
the surface of the greenstuff so
to speak. Just 'paint' water/Vaseline
along the 'hairs' and you'll see!
Tip:
Vaseline is great when sculpting,
but it makes it all kinda messy,
and the new greenstuff won't hold
on greasy surfaces that good, so
after letting the greenstuff dry
for a day, I washed it with warm
water and soap, using an old soft
toothbrush. Do this often, and you'll
see which parts aren't glued properly
too! (at least do this before undercoating,
because you can't see it (even
if you haven't use Vaseline!!), the
grease is there! If you don't wash
the mini with soap, the undercoat
won't hold!)
R i g h t A
r m - After the wash I glued
the right arm on and, like with
the left arm, resculpted the upper
right arm simply by connecting
lines. Problem was however, that
because of its new position a right
armpit had to be made, something
that I saw just now. So after letting
the greenstuff dry and sanding
it a little where needed (grit
800-1200), I started cutting away.
After that I sanded his armpit,
to remove the cuttingmarks. |
|
|
|
|
|
|
|
|
|
|
|
|
Ok
almost finished, few things to change.
I removed the burn mark on his right
shoulder to resculpt his arm, so
I wanted the one on his upper right
leg gone too. He is going to get
tattoo's, but they will be painted
on! I just covered the mark with
an extra piece of fur/cloth.
The extra
horns, rags on the top of the wand
an sword, and any other piece of
freely hanging cloth (read greenstuff!
:)) was given an coat/touch of superglue,
this to prevent movement/holding
it into place. I just hate it when
those loose bits bend and cause the
paint to crack, when you apply a
thin coat of superglue (both sides
or it will curl up on you!) it goes
rock hard, and you will have a better
chance to keep that coat of paint
in one piece! And then for the real
last touch, the 2 arrows. I looked
and tried a lot before coming up
with this method of making arrows,
because one way or the other, they
always seem to get to large! I use
short pieces 0,5 steel wire (I use
steel again because this doesn't
bend that easily, making sure you
end up with straight arrows!) and
0,75mmx0,2mm plastic strips (bought
at a local hobby shop that sells
little trains and stuff). These strips
I cut in 4 mm bits with an 45 degree
angle and then the difficult part
starts, I glue 3 of those pieces
onto the end of an 0,5 mm steel piece
of wire with superglue. I mostly
do 10 at a time, ending up with like
6 good arrows! Take your time, but
try it, those are the only good size
arrows I know of!
After
all this work I let the mini thoroughly
dry and harden for a day, and then
unscrewed the mini from it's base.
I washed the base with soap and a
soft toothbrush, making sure he was
clean and 'fat free!' I screwed the
little screw back into the right
foot of the mini and clamped the
end of it with a pair of automatically
locking pliers, washed it like the
base and let it dry.
|
|
|
|
|
|
|
|
| |
|
|
|
|
|
|
|