PROJECT III

WOLVEN GRAVE GUARD
by Confrontation (Rackham)
Conversion Report Part 1-3

Painting Report Part ?-? >>

When I came across the miniatures from the Confrontation range on the internet I new I had to have one, or two or.... So after a long search I found out that the store where I normally bought my Games Work Shop mini's had them as well tugged away in a small corner of the store. (no look at the most obvious place, what a dumb idea is that...!) The first one was this Grave Guard and I will try to explain why it looks like it does right now and how I did that!

click the thumbs once for a full view!!

INSPIRATION & BACKGROUND

Click the thumbnail for a larger view!

Whenever I convert a mini I have the end result more or less in my head before I even open the package. I imagine the end pose, think of the character this miniature is going to represent etc. Often I collect pictures of the miniature I'm going to paint and convert from the internet (see Miniature Links), see how others did the job. After that I think of the possibilities of the figure and on the character. In this case I decided I wanted this wolf to be a shaman. A wolfen shaman, lots of hair, bones, skulls, raggs etc. After making that decision I started to browse my fantasy art (see Fantasy Art Links) collection to get some references (see pic right part (Keith Parkinson©) & left part (Clyde Caldwell©) for the reference material used).

Ok mini is bought, you always get some new ideas when you hold the actual model, you see it's not cast in 1 piece but in 5 (head, torso, left arm, right arm and feet), which means more possibilities to make a good pose and to add detail. The important thing here is, make up your mind about a certain theme and stick with it. If everything you add, change or remove is done with a central theme in mind, it will make sense afterward. If you just start with bigger axes, more guns, more hair it will look odd and overdone!

Ok thought of everything, you got in mind what you want to do (you think! you will adjust and make up new stuff along the way, no biggy, just keep ...exactly keep that theme in mind) bring in the tools!

HEAD

Click the thumbnail for a larger view!

Click the thumbnail for a larger view!

Click the thumbnail for a larger view!

Because the superb quality of the confrontation models I just had to remove a few mold lines .The head had non of those so I could get started with converting right away.

F 
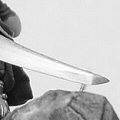
r o n t T e e t h - Separated them by cutting them apart even further and sharpened them a little with sandpaper (grit 800-1200) and a hobby knife (scrape rather than cut, the metal that is used to make these models is relatively soft and if you cut you can easily end up with a headless figure, so: scrape when you are using a knife!!)

2 
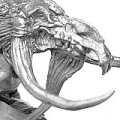
T u s k s - I bended them back a little, so they would point out more, as 2 big tusks, keeping attackers at bay rather than curling inward. After that I sharpened the ends with a bit of sandpaper (400-800-1200 grit)

G o a t e e - (I did his goatee after I glued his head onto his torso to make sure it was hanging in the right direction!!) Clipped his old one, and drilled a little hole instead off that one. I glued a piece of brass wire into that for support. This should hold the greenstufff better and keeps it from falling of while sculpting. This works best when you cut a few times into the wire making tiny hooks which prevents the greenstufff from sliding off the wire.

Note: While drying and sculpting keep the end pose of the figure and the direction of the wind/motion of the figure in mind (make sure that all the pieces of fur, hair and clothing are waving in the same/right direction!!)

E a r s - Separated them, so they stand out a bit better, just cut a few times between them to widen the gap and when they were separated I sanded them a little (grit 800-1200) and sharpened them with the good old hobby knife and sandpaper (grit 1200). After the head was glued on top of the torso, and the extra horns (this will come next) I noticed that the ears were mere flat bits hanging behind the extra horns. You couldn't see into his ears anymore. So I added a small strip of greenstufff along the upper edge of each ear.

2 
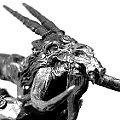
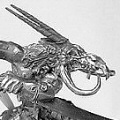
E x t r a H o r n s - I wanted to place 2 extra horns just behind the eye sockets of the skull (see pic 5 (GW Skaven vermin lord©) for reference and 6 (Chris Achilleos©) for general look and idea). I used a file to flatten the surface behind the sockets to get a flat starting point for my hand drill. I made 2 small dents with a steel pin to give the drill more grip. After the holes were drilled...... @!*&%@@#>:? AAAAAAAAAAAAAAAghhrrr, it happened. You will learn that one way or the other, something goes wrong during converting. I drilled 1 of the 2 holes just to deep and came out with the drill in the middle of his face, not 2 worry though (hang on I will explain later how I handled that), I glued 2 short pieces of steel wire into the holes. I didn't use brass here, because that tends to bend too fast, steel is harder to clip, but will hold its form. Then I made 2 horns using greenstufff. I made 2 round pieces and then, while holding either end between thumb and index finger, twisted one end while holding the other in place. I rolled the piece between the index finger and thumb of my right hand and simultaneous pulled it away from my left hand till it broke. The result, a long and thin strand of greenstuff that starts relatively thick and becomes thinner and thinner to the end and looks like a twisted piece of horn, ahhh isn't it easy or what (this is a very easy way to make great horns. If I have some greenstufff that I don't use, I don't make little balls out of them, I make those horns, let them dry and throw them into the good old bits box!!). After letting both horns to dry and cutting them to size, I drilled a little hole in the thicker end of them and glued them onto the steel pieces of wire. When that was dry I used a little bit of green stuff to make the transition between skull and horn. After that I cut away the access metal from my drill failure, and filled that with greenstufff and remodeled that part of his face! You see don't go ballistic when something goes wrong, just make sure you've got enough greenstufff.

LEFT ARM

Click the thumbnail for a larger view!

Click the thumbnail for a larger view!

S w o r d - Ok this is something I ALWAYS do with EVERY weapon! Because of the limitations of greenstuff, weapons are sculpted rather thick and blunt, although these baby's should look sharp and mean! So I sharpen and file every blade and axe till you could cut yourself with them, literally, no bull! File, sand, scrape till it's really sharp and then sand it one more time with 1000-1200 grit to polish it. You'll see, it'll just look better!

R a g - I lengthened the rag wrapped around the hilt of the sword with 2 pieces of greenstufff. Just to add to the dynamic pose that I wanted. The shaman must look like he's moving as if in a trance, blocking blows, attacking, using magic.... I held the left arm, when drying the greenstufff, in such a position that, when dry, and the arm in it's final place on the mini, would not hang down, but more horizontally. As if he was moving that arm swiftly!

P i n n i n g - In this stage I started to drill holes and started pinning! I drilled a little hole into the hollow part of the left arm, the part I would put my glue onto when attaching it to the torso. Glued a little piece of brass wire into it and clipped it off leaving about 5 mm sticking out of the arm. After marking the middle of the place the arm would be glued onto, on the torso, I also drilled a hole. I did not glued it on till the very end of converting though, reducing the possibility of filing or damaging to a minimal. (when you glue everything you cannot alter it (especially because I'm using 2 part epoxy glue for pinning, when dry it's as hard as steel!) therefore I convert everything I can when still detached, and when I'm sure everything I can do is done, I glue the different pieces together, and do the rest! This way you can put the arm on and of during converting and can look if it's ok, if not, take it of again and do your alterations!) I also did this, at this point, with the right arm, the head and the feet-part, so a total of 8 holes and 4 pins. So at this point you can hold the different pieces by their brass fittings, and can do you sculpting, after that you can glue the model together. The point where the pin for the wand, the goatee and the pin for attaching the mini onto the base are also marked.