|
| |
|
|
|
|
 |
|
 |
|
This
was going to be an 'in between' project,
and I didn't follow my normal routine.
Normally I get inspired by fantasy
art, a movie or book for example,
in this case I spent 10 minutes digging
in my bitsbox and found an 'old'
GW mini that came (free) with White
Dwarf issue No. 238, Aenur, and was
meant to be a part of a Mordheim
warband. A mini with probably the
most beautiful sculpted elven face
I've seen. Furthermore, a plain big
cloak to practice blending, and a
lot of fine detail, perfectly to
put my painting skills to the test!
The
inspiration for the base came from
the article in the above mentioned
White Dwarf, I chose a dark street
scene. I wanted a cobblestone/flagstone
kind of base with 1 object next to
the mini, something like a pile of
garbage, a rat or something similar."Less
is more" would be the thing to keep
in mind, nothing fancy.
After
further examination of my pile of
plasticard/-tube/-rod/ etc. I came
up with a piece of plasticard with
a cobble- flagstone effect, and after
a trip to a local hobby store I found
a plastic antique looking streetlight,
this would fit perfectly into my
little street scene, and an even
bigger test of my painting skills,
because I had to do some really difficult
shading!
|
|
 |
|
 |
|
|
|
|
|
|
|
|
I used
the same type of wooden base I used
With the Grave Guard, a wooden table
leg end (these are used at the end
of a steel pipe table leg!). I sawed
the top off and using a file and
sandpaper (grit 60-120) to get the
shape I desired. After that I took
my hobbyknife and cut out a piece
of cobblestone effect plasicard following
the different stones, to fit on top
of my wooden base. I glued that onto
the base using superglue, and filled
the transition areas between wood
and plastic with 2 part filler. I
use this 2 part variant primarily
because of it's fast drying ability!
After 10 minutes of drying time (the
filler was a little harder now, and
didn't stick to my tools by anymore)
I made some texture with a toothpick
and a small steel brush into the
semi hard filler. After that I drilled
a little hole into the bottom of
the base and screwed a large screw
into the hole. That screw would be
used to hold the base when staining
it. Because the original wood color
is quite light I like to stain it
with a darker color, just using water
based stain. Apply it in like 3 coats
and make sure it dries thoroughly
and use grit 400-800 sandpaper to
sand between coats (no after coat
3 you DO NOT USE THE SANDPAPER Duh
:)!!) When you do that you end up
with something like you can see at
the pictures at the left!
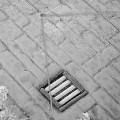
At this
time I came up with the idea to add
a drain hole. I cut out a square,
a little bigger than Aenur's foot,
following the line the stones were
in. Using my scalpel and a file I
made the edges curve inwards, towards
the hole that I made, and after that
sanded them (grit 800-1000). Using
4 little pieces of plastic rod (I
believe 1 or 0,75 mm diameter) (later
Craig stocks www.slappingpaint.net pointed
out that those bars should be flat
instead of round, but after using
greenstuff trying to correct the
mistake and trying like 4 times (and
finding out the amount of greenstuff
was to little to stick to the round
bars) I decided that the only way
to try to correct this mistake was
by painting it flat using reflections
correctly. Even looking closely,
the flat/round issue wasn't that
big a deal, it hardly shows, because
the very tips of the rods are a little
flattened to make sure the greenstuff
around the edges would stay in place,
and no plastic would stick through
the greenstuff when sculpting.) Then
when those 4 small bars were glued
in place I prepared a small amount
of greenstuff and sculpted the edges,
again nothing fancy, 4 straight flat
edges.
Ok surface
ready, drain hole ready, time to
figure out the positioning of the
streetlight and the mini. Using the
drain hole as a reference point I
made a small triangle, drain on one
angle, streetlight and mini on the
other two.
I measured
the diameter of the street light
and took a electric drill and drilled
a 4 mm deep hole at the point I marked.
I did not glued the street light
into it though, because it would
stand in the way when painting Aenur.
This I did after the mini and the
light were painted!
|
|
|
|
|
|
|
|
|
|
|
|
|
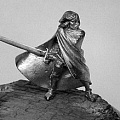
The
base was ready, streetlight was assembled,
time for my focus point, the mini.
The mini is quite finished and I
decided that no big heavy converting
was going to be needed.
First
thing I did was removing mold lines,
the cloak had a big edge in it, and
it took a bit of filing and sanding
(grit 400 800-1000) before it was
gone. After that I did the usual
'sword sharpening' the blade was
rather thick and heavy for the mini,
so with a flat file I filed it thinner,
and gave it a tanto style edge (this
was, I have to admit, an accident,
I filed a bit to rough and the sharp
tip of the blade was damaged, so
it wasn't until THEN that I decided
to go for the tanto style :) !!)
The mini needed no greenstuff really,
I just gave him some hair extensions,
hehe, I just lengthened his hair
a little! (I just had to use greenstuff
I suppose!)
All components
were ready, the only thing to do
was glue on the mini. The base was
a good thing to hold the mini when
painting, so I decided to glue the
mini onto the base before painting
(something I normally never do!)
The position of one of the feet was
already marked. So I drilled a 1
mm hole into Aenur's right leg and
glued a piece of brass wire into
that, after the glue was dry I clipped
it leaving 5 mm sticking out of his
right boot. That piece of wire was
used to position Aenur even better,
after that at the point I marked
also a 1mm hole was drilled, I could
place the mini onto the base and
could turn him around only 1 point,
the right boot! When the perfect
position was found I glued the 5mm
brass wire end into the hole and
also put a little glue under his
left boot to further fixate his position.
ALL IS
DONE!! You see with almost no material
and with minimal sculpting skills,
a unique and beautiful base and mini.
Took (without drying times of paint
greenstuff and glue) maybe 3 hours
of real work!
|
|
|
|
|
|
|
|
|
|
|
|
|
|