PROJECT IV

AENUR
by Games Workshop
Painting Report part 1-1

<< Conversion Report Part 1-1

Click the thumbnail for a larger view!

Well 
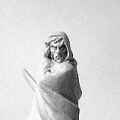
as mentioned before this Aenur was a mini to test my rusty painting skills, a big cloak to practice blending, a streetlight to make it even harder with the unusual shading and some good fine detail for that one hair brush :). I'll try to explain the different things I did during painting, but because I am planning to write a painting tutorial (with all basic tools, paints and tips&tricks) I won't go to deep into stuff.

click the thumbs once for a full view!!

I just picked a good looking mini out of my bitsbox, and didn't had any reference material to base my colors on. So I just decided to limit my colorsceme to not too bright, not too many and downshaded colors. Furthermore I wanted to do something with the streetlight, it would give some dark, sharp shade in his face, cloak etc, so I'd liked to do something with that too. Sooo... took my brushes, washed them with some shampoo and freed some desk space to work on, ready for the ultimate test...

Ok first things first, UNDERCOAT, ca&n't stress this to much, it's maybe THE most important part of painting. After hours and hours of converting undercoat can ruin your mini! So a few things to keep in mind! Clean your mini with water and soap (especially when you've converted. Greenstuff is kinda greasy and glue and undercoat isn't that good a combination either!!), just take an old (soft) toothbrush, hold your mini under running water and using soap and the toothbrush, CLEAN IT THOROUGHLY. After that make sure all the soap is washed off and let the mini dry.

After every nook and cranny is dry you can start undercoating. I use the stuff from GW, the one that comes in a spraycan, that works best. Shake, shake and shake again and make sure a window is open or you are standing outside, the stuff stinks like hell! Apply the undercoat in 2 or 3 THIN layers. Place the mini in a cardboard box or something, to make sure you keep the rest of your room clean! Now this is important: when undercoating, never ever point the can at the mini directly and press the button, never!! You start pointing 20 cm left (or right) from the mini and approximately 30 cm away from it. Motion towards the mini and press BEFORE the mini, and while holding the button down move to the right, spraying the mini, and when you're passed the mini release again. Do this in a fast fluent motion! You kinda make undercoat fog, and this mist rains down on the mini creating a matt surface instead of the almost glossy finish you get when spraying directly onto the mini (clogging most of the detail in the process!!). Use this procedure 2 or 3 times with a 30 min pause to let the coat dry, until you have an even coat of white on the mini. After that you can use an old flat brush and watered down primer (from a can, I also use the 'smelly primer' from GW) to get too the places the spraypaint didn't. Ok after that, let the hole thing dry and then it's time for the real work!!

Click the thumbnail for a larger view!
Ok I started with the base, I wanted a dirty-medieval-look-flagstone-surface! You know the kind :) Just washed some watered down greens and browns with black and some matt medium and washed the base till it looked like the picture. Make sure to use more or less water and more or less from the same color on different places, no pavement looks even and it looks better when it looks dirty like this. After that I didn't go on with highlighting, because I would be holding the base during painting the mini, highlight would wear off and would have to be repainted anyway! So the rest of the base would have to wait till after the mini!!

Click the thumbnail for a larger view!

Click the thumbnail for a larger view!

Click the thumbnail for a larger view!

Click the thumbnail for a larger view!

After examining the mini I came to the following conclusion: the mini consists out of 4 major areas when painting. The head, cloak, boots and the inner part of the cloak with the rest of the body. All areas can be reached separately without having to watch if I'm ruining another. So I started with the head.

First I made a mixture of a flesh color with a large amount of brown to give the face a base color. Watered down this took about 3 layers. After that I added a little retarder to the mix and some more flesh color (acrylic retarder lengthens the drying time, this makes wet blending a lot easier!) The hard part was to check the strange shade with a lamp at approximately the same place as the streetlight would go, because this gives different shades then normal. As you can see on the pics at this stage I didn't do a rather good job at the shade, I did it like I always did, but I corrected it later on, adding more and more shade (watered down black/brown) under the cheekbones etc.

For now, just normal blending, adding more flesh color to the mix and later on white, adding up to the very edges of the face, keeping the position of the light source in mind. When the final blending stage was done (ALMOST pure white) and letting the retarder dry (at this point there were about 25 layers on there) it was time for the eyes/eye. This I did by adding retarder, black, the brown used as a base for the face and water together and filled the eyesocket with it. After letting that dry a bit I took pure white with a little retarder and with one stroke painted a white line into the socket. When all that was fully dried I painted a single black line into the eye to represent the iris.

The face almost finished, time to add hair. I added a little more with greenstuff so this mini has slightly longer hair then the original. Adding the same brown and flesh color I used for the face with some white and yellow gave me the mix to start with the hair. Again following the same pattern, adding more yellow and white and blending I added depth and life to the hair. Like with the face I left certain areas where the light from the streetlight wouldn't reach, darker and left out the yellow, so it would look more gray in the dark then the usual golden yellow.